Microwave Sushi Rice

//cookanyday.com/cdn/shop/files/Anyday_Photos_Recipes_SushiRice_1040_2_bff6610c-1cee-4b98-8cec-18628120a0cc_360x.webp?v=1722543262 Perfectly cooked sushi rice made in the glass Anyday dish, delivering fluffy and flavorful rice with ease. This quick and efficient method ensures ideal texture and consistency, perfect for sushi rolls or rice bowls.
PT2M PT25M

Prep Time

2 mins

Cook Time

25 mins

Free Time

to book a trip to Japan

The key to great sushi rice, first and foremost, is in choosing the right rice. Japanese short-grain rice is the one to use for its size and starch content. Seasoning plays an equally important role, with rice vinegar, sugar, and salt playing together for a slightly sweet, tangy flavor. The microwave makes the whole process super hands-off.

Our recipe ensures a seamless experience that empowers you to create delectable sushi bowls or rolls in no time. Elevate your sushi-making skills with our step-by-step guide and expert tips.

All of Anyday’s recipes are tested (and retested!) in many different microwaves and home kitchens to make sure they work — and work well. Unless specified otherwise, all recipes should be cooked at full power.

Rice & Grains, Deep Dish, Japanese, meal prep, onigiri, poke bowl, Deep Dish, short grain rice, sushi, sushi bowl, sushi rice Rice & Grains

What You’ll Need

What You’ll Need

The Medium Deep Dish

The best dish for 1-2 portions of grains, veggies, mac and cheese, ramen, and more.

The Strainer

Introducing: The Strainer! Flexible-yet-sturdy clips attach this clever ‘colander’ onto your Anyday dish, making it a master multitasker. Use this strainer on any size or shape Anyday dish.

The Anyhand Mitts

Handle hot Anyday dishes with care with these microwave mitts that double as trivets!
Try Anyday

Select your serving size and microwave wattage in the dropdown. The recipe will change accordingly.

1-2

Select your microwave wattage in the dropdown. The cook times in this recipe will automatically change accordingly.

[[video-wattage]]

To find your microwave’s wattage, look at the front panel, the side of the door, in the back, in the user manual, or Google the model number. If both an input and output wattage are listed, use the output.

Wattage translates to how powerful the microwave is. The higher the wattage, the faster your food will cook. The lower the wattage, the longer the cook time.

When in doubt, start with less time — you can always add more.

Microwave oven by power - 700w
700w

Recommended 

Dish

The Medium Deep Dish

Ingredients

For seasoning:

  • 1 tablespoon rice vinegar
  • ½ tablespoons sugar
  • ½ teaspoon kosher salt

For the rice:

  • ½ cup (100g) short-grain rice or sushi rice
  • ¾ cup (180ml) of water

Preparation

  1. For the seasoning: mix the vinegar, sugar, and salt in an Small Anyday Dish or a microwave-safe ramekin and cook for 1-2 minutes, or until the sugar and salt are fully dissolved. Set aside when ready.
  2. For the rice: Place the rice in an Deep Anyday dish and rinse thoroughly under cold tap water, swirling the rice around gently until the water becomes cloudy. Using the Anyday Strainer, strain the excess water. Repeat this process until the water runs clear.
  3. After straining, add the water and spread the rice in an even layer. Cover with the lid (knob lifted).
  4. Cook in the microwave at Power Level 4tooltip for 22 mins, or until the water has been absorbed and the rice is tender (try one!). If rice is still too hard, add more time at the same power level in 2-minute increments.
  5. Rest for 2-5 minutes with the lid on to allow the rice to finish steaming.
  6. Season the rice with the prepared vinegar gently fold the rice until well seasoned.
  7. Allow the rice to cool before using it as rolls or enjoy warm for sushi bowls. Keep it covered with the lid to prevent it from drying.

Serving suggestions & tips

  • Furikake seasoning: Sprinkle furikake or other Japanese-style rice seasoning over the rice for a burst of umami flavor.
  • Sushi bowl: Top the rice with spicy tuna salad, sesame seeds, avocado, and seaweed salad for a quick and flavorful sushi bowl.
  • Egg and BBQ combo: Add a poached egg and drizzle with Japanese BBQ sauce for a savory twist.
  • DIY sushi: Get creative by making your own sushi rolls or shaping onigiri at home for a hands-on meal.

Recipe notes

  • Rinsing the rice is important to achieve tender, fluffy rice. Do not skip this step!
  • Allow the rice to cool if using for onigiri or rolls, or enjoy warm for sushi bowls.
  • Adding the vinegar mixture while the rice is still hot will ensure well-seasoned, shiny rice.
  • Use the Japanese method of “cutting and folding” the rice with a flat spatula to avoid mushy rice.
  • Keep the cool, seasoned rice covered with the lid to prevent it from drying out.
  • Microwave ovens vary, even with the same wattages. Adjust cooking times as needed.

All You Need to Know About Making Sushi Rice in the Microwave

Can I make sushi rice in the microwave?

Yes, you can! Cooking rice in an Anyday dish is not only easy but also a better experience. Before cooking, the rice should rinsed in cold water until the water runs clear to remove as much excess starch as possible. When using the microwave, rice gets steamed slowly, just like in an electric rice cooker, but without the need to pull out another appliance on your countertop. The Anyday and the microwave make the dream team for cooking rice. Check out our recipes for both white and brown rice too!

Why do we use a lower power level to cook the rice?

Using a lower power level helps prevent the rice from overcooking or becoming too mushy. It allows for a gentler cooking process, ensuring the rice cooks evenly and maintains its desired texture

Why do I need to rinse the rice? How many times should I rinse it?

Rinsing rice is essential to remove excess starch, which can cause the grains to become sticky and clump together during cooking. Thoroughly rinsing the rice helps it cook up light and fluffy, with each grain staying perfectly separate. Use the Anyday Strainer to make the process quick and easy. Using an Anyday Strainer, rinse and drain the rice repeatedly until the water runs clear—this usually takes about 3 to 4 rinses. Properly rinsing the rice also improves its texture and overall quality in the finished dish.

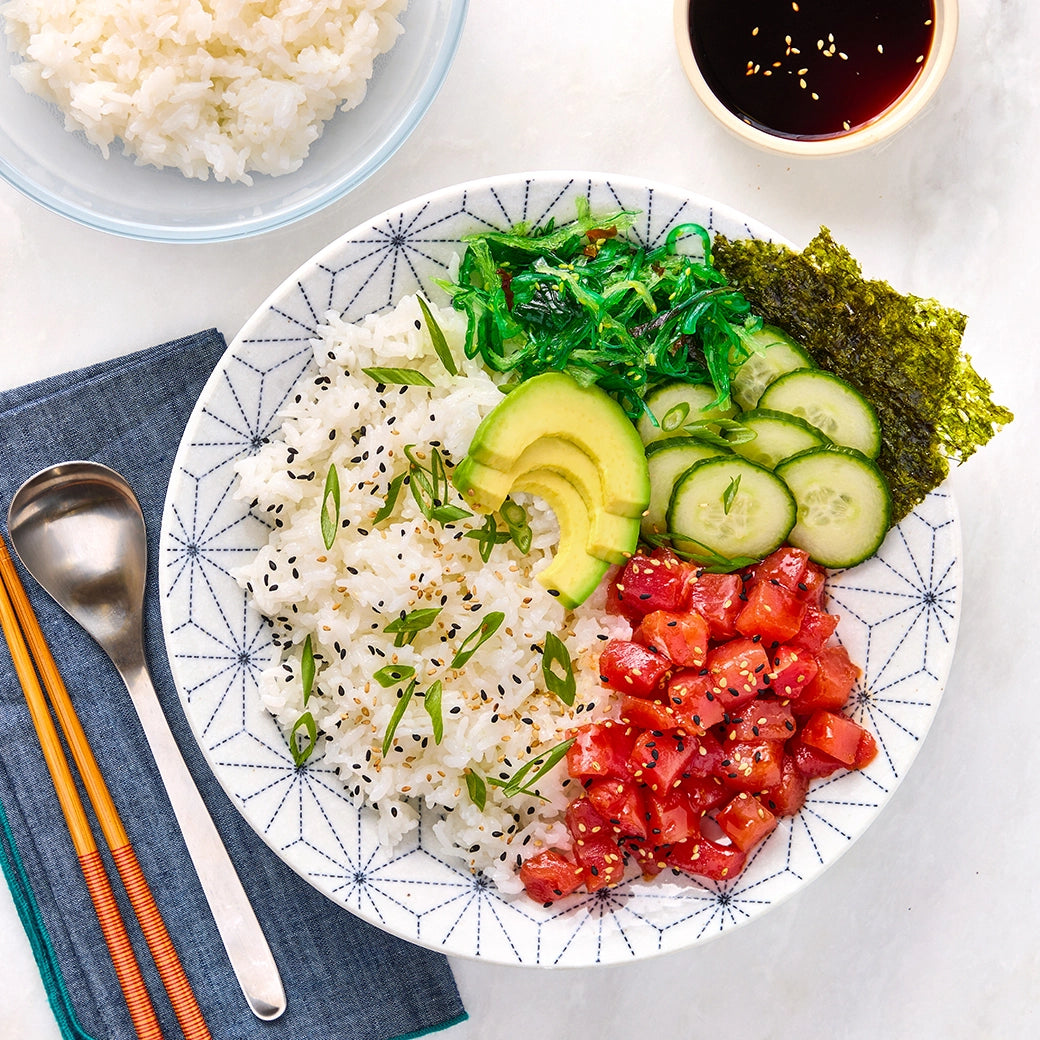
Why do we use short-grain rice for sushi rice?

Short-grain rice, also known as sushi rice, is preferred for sushi because of its sticky texture, which helps the rice hold together when rolled or shaped into sushi.

Why do we let the rice rest after cooking before seasoning?

Allowing the rice to rest with the lid on after cooking helps it finish steaming, resulting in a fluffy and evenly cooked texture. This resting period also allows the rice to cool slightly, making it easier to handle when seasoning with vinegar mixture.

Why is the rice seasoned after cooking?

Seasoning the rice after cooking with a mixture of rice vinegar, sugar, and salt enhances its flavor and texture. The vinegar adds a tangy balance, while sugar firms up the grains and gives them a glossy appearance. Salt enhances flavor and regulates moisture, ensuring the rice maintains a desirable texture. This step is crucial for achieving delicious and authentic sushi rice.

Can I save or freeze leftover sushi rice?

Yes, leftover sushi rice can be stored in the refrigerator for a few days or frozen for longer-term storage. Be sure to cool the rice completely before storing it in the Anyday dish with the lid on. To properly freeze, place the cooked and now cold rice in the Anytime Freezer Trays and save for up to 3 months.

What's the best way to reheat leftover sushi rice?

To reheat sushi rice, sprinkle a little water over the rice and cover it with the Anyday lid in vented position. Microwave in short intervals, fluffing the rice with a fork until heated through. If the rice is frozen, just add the pucks into the Anyday dish and heat for about 1 minute per puck until heated through.

Shop our bestsellers

12-Piece Essentials Set

$200
$150
Bestseller

8-Piece Everyday Set

$160
$125

4-Piece Starter Set

$90
$75

8-Piece College Dorm Set

$110
$90